


Monday, November 12, 2012
*click on image to view full-size*
This tutorial was written by Millie on 11/12/12.
I am assuming you have psp knowledge if you're trying this.
This tag was made out of my own creativity and any similarity is just coincidence.
I used version pspx2.
Let's begin!
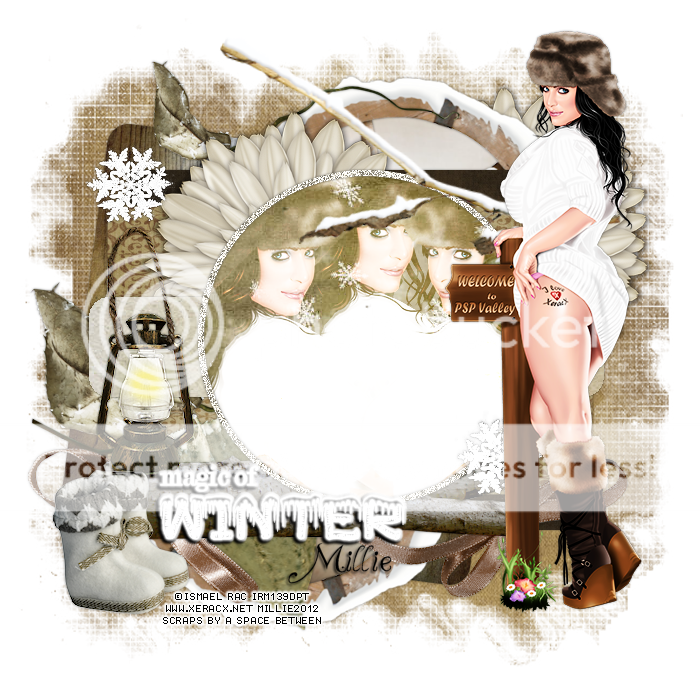
FTU The Magic Of Winter
Artist: Ismael Rac
Scrapkit: Winter Magic by A Space Between
Template: 129 by me HERE
Mask: Babs Bitzy Beez Designz Mask 42
Font: A Yummy Apology
Open your mask and minimize it to your workspace.
Drop shadow throughout on all elements 1 1 50 5 unless noted
Open template 129 - ctrl + D - close original
Make your background layer visible and delete your cr layer
Go to layer 1, selections - all, float, defloat, new layer
Open paper 9, c/p into selection
Selections - none
Go to layer 3 and merge it down to layer 2
Selections - all, float, defloat, new layer
Open paper7, c/p into selection, selections - none
Open Element 27, resize by 80% - sharpen
c/p as a new layer, move it to the left some
Move it up so it aligns with the circle (layer2)
Duplicate wheel, image - flip and align with bottom circle
Go to layer 4, selections - all, float, defloat, new layer
Open paper 10, c/p into selection
Selections - none
Go to layer 5, selections - all, float, defloat, new layer
Open paper 11, c/p into selection
Selections - none
Open element 25, c/p as new layer, image - mirror
Move around to your liking
Open element6, c/p as new layer, move to the left some
Duplicate it, move it to the right of the tag
Move it down so its the layer right above the background layer
Open element 11, c/p as new layer, move to the left so its aligned with layer 5
Open element 56, c/p as new layer, move under log layer
Go to layer 6, selections - all, float, defloat
Open paper 3, c/p as a new layer, selections - invert - delete
selections - none
Open element 20, resize by 65% - sharpen, c/p as new layer
place to the left so its on top of the log
Go to layer 7
Open your tube close up, c/p as new layer, duplicate mirror
move next to first tube, duplicate and move to left some
When you're happy with the way the tubes look merge them together
Move them so they are placed by circle (layer 7)
On layer 7, click inside the circle w magic wand
Open your paper 8 as a new layer, invert - delete
On tube layer hit delete, selections - none
On tube layer, apply xero-radiance default setting
Change tube blend to overlay or screen which ever u like best
Back on layer 7 click inside of it again with magic wand, go to tube layer
new layer, selections - modify - select selections border - 3
flood fill with color from your tag
Adjust - add noise - uniform - 100, selections - none
Open Element 30, resize by 50% - sharpen
c/p as new layer, move to the top right of tag
Play around with it with your deform tool and place to your liking
add drop shadow
Go to layer 10, duplicate, add drop shadow of 2 -2 65 6 to bottom one
Merge together, move and place to your liking
Open element16, resize by 50%, then by 60% - sharpen, c/p as new layer
Move to the bottom left of your tag
Go to the top layer of your tag
Open your full tube, c/p as a new layer
Place the tube to the right of the tag, duplicate your tube
Add xero - radiance on duplicate, change blend to soft light, opacity 65
Close your background layer - merge visible
Open paper13, c/p as new layer
Apply your mask
Layers - new mask layer - from image
Find your mask name in the source window
Make from source luminance
If you use same mask I did then make sure invert is checked
Hit ok
Merge - group
delete background layer, merge visible, add your credits and name
We are done!
Thanks for trying my tutorial!
Subscribe to:
Post Comments
(Atom)


0 comments:
Post a Comment